What Is Home Solar Installation and How Does It Work?
Home solar installation is the process of designing and fitting a rooftop photovoltaic system that converts sunlight into electricity. Panels produce direct-current power; an inverter converts it into alternating current for household use. A battery can store surplus energy, but it is optional. The system may also draw electricity from the grid when solar production falls. Simple in principle. Not always simple in practice.
The market is substantial. SEIA and Wood Mackenzie reported that the United States added about 6.8 gigawatts of residential solar capacity in 2023 in their U.S. Solar Market Insight report. That figure shows adoption, not what every household will save. Roof angle, shade from trees, local weather, electricity rates, and equipment costs all affect results. A shaded roof at 3 p.m. can produce far less power than a sunny, unobstructed one.
A typical project begins with a review of electricity bills, roof condition, and available sunlight. The installer then proposes a system size and equipment, followed by required local approvals and utility coordination. After mounting, wiring, inspection, and connection, the system can begin generating power. Battery storage may change how much energy a home uses after sunset. Ask for written production estimates and clear assumptions. Estimates are still estimates. This guide explains each stage, the equipment involved, and the practical questions homeowners should ask before signing. It also considers limitations: solar can lower grid use, but savings and payback are not guaranteed. A careful assessment matters more than a glossy sales promise.
What Home Solar Installation Involves
Home solar installation turns an exposed roof or ground area into a small power plant. A contractor checks roof condition, electrical service, shade, and household electricity use. A chimney shadow can reduce output more than homeowners expect. Not plug-and-play.
The design sets panel locations, inverter type, wiring, and any battery storage. Installers attach mounting rails, secure panels, connect electrical equipment, and arrange inspections and utility approval. The exact sequence varies by location. One overlooked detail is roof age: replacing shingles after panels are installed can mean extra removal and reinstallation work.
NREL’s U.S. Solar Photovoltaic System and Energy Storage Cost Benchmarks: Q1 2024 estimated a modeled residential, photovoltaic-only system cost of $3.15 per watt of direct-current capacity. It is a benchmark, not a quote; roof complexity, equipment, and local labor can shift actual costs. Before installation, ask how the design estimates shade and seasonal production. After connection, monitoring can show whether the system is performing as expected, though estimates are not guarantees. A little humility helps: cloudy weeks and changing household use make real bills differ from projections.
How a Residential Solar Power System Works
A residential solar power system turns sunlight into electricity your home can use. Roof-mounted panels contain photovoltaic cells that produce direct-current electricity when sunlight reaches them. An inverter converts that electricity into alternating current, the type used by household lights and appliances. It is not magic. On a sunny afternoon, the system may power a refrigerator, lamps, and other running devices at the same time.
A qualified installer checks the roof’s condition, shade, angle, and electrical equipment before fitting the panels and connecting the system. Small details matter: a chimney’s shadow can reduce output from nearby panels, and older wiring may need attention. When the panels produce more electricity than the home is using, surplus power may flow to the grid, depending on local arrangements. At night or during heavy cloud, the home can draw electricity from the grid; a battery can store some daytime energy for later use. Batteries are optional. Actual production changes with season, weather, roof direction, and household demand, so estimates are not guarantees. A system that looks efficient on paper may perform differently once trees leaf out or family routines change.
How a Residential Solar Power System Works
Illustrative clear-day output for a 6 kW residential solar array. Solar panels convert sunlight into DC electricity; an inverter converts it to AC electricity for home use. Any surplus can be sent to the grid or stored in a battery. Actual output varies with location, weather, roof orientation, and system design.
Assessing a Home and Designing the Solar System
Assessing a home starts with the roof, but roof area alone does not determine solar potential. A qualified assessment checks orientation, pitch, shading, roof condition, and the electrical panel. A branch casting a sharp afternoon shadow can reduce output from nearby panels. The installer should also review a year of electricity bills to understand seasonal use and likely future loads, such as an added heat pump.
NREL’s 2016 rooftop solar technical-potential study estimated 1,118 gigawatts of capacity across U.S. rooftops. That national figure is not a forecast for any individual home; it highlights how varied roof suitability can be. For a household, designers can model local weather, panel direction, and system losses with NREL’s PVWatts tool. Its default loss assumption is 14%, a useful starting point rather than a site-specific guarantee. A site visit still matters. Models can miss real shade.
Tips: Ask for the proposed system size, estimated annual production, and the assumptions behind both. Compare the production estimate with your actual usage, not just the roof’s maximum panel count. Note any trees or roof repairs that could change the design. A careful plan may feel less impressive on paper, but it is easier to trust.
Installing the Panels and Electrical Components
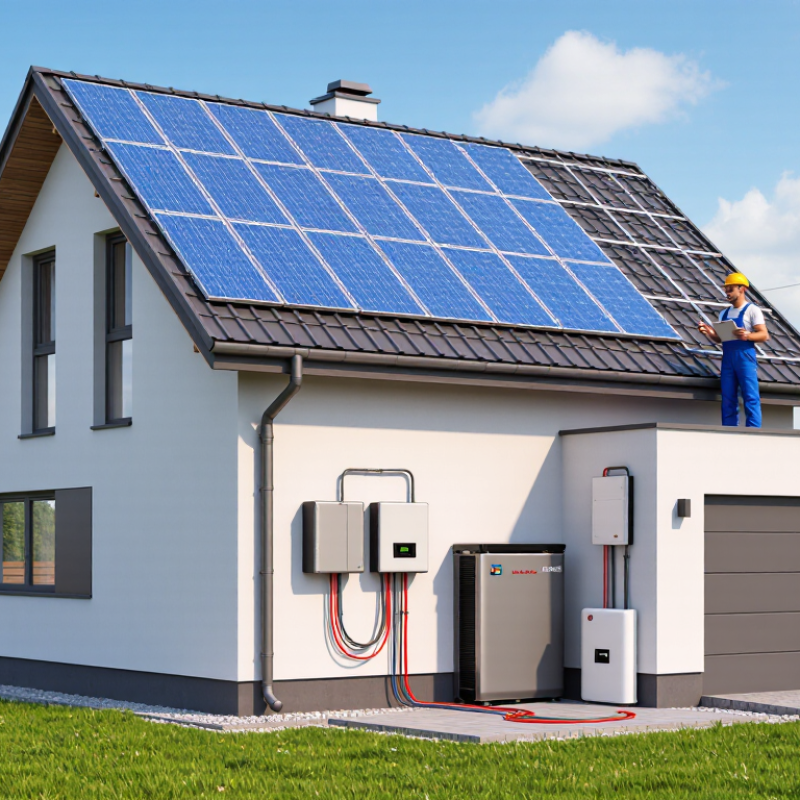
A home solar installation begins with a careful check of the roof, mounting points, and planned panel layout. Installers look for damaged shingles, weak framing, and areas shaded by trees or chimneys. The panels sit on rails secured to the roof structure, not just the outer roofing material. Flashing helps keep water out around roof penetrations. Small details matter. Rails must be aligned, fasteners tightened to the specified limits, and panels spaced to allow airflow and maintenance access. A neat-looking array is useful, but a secure, weather-resistant installation matters more.
After the panels are mounted, an installer routes wiring through protected conduit to an inverter or other system equipment. The inverter changes the panels’ direct-current electricity into alternating current for household use. Electrical connections, grounding, and required disconnects need to be installed and checked by qualified professionals. A homeowner can ask how cables are protected from weather and where the shutdown controls are located. That part is easy to miss. Before the system is switched on, the team tests connections and confirms that readings match expected performance. I would not treat a tidy cable run as proof that everything is correct; test results and clear documentation matter too.
Connecting, Testing, and Activating the System
Once the panels and inverter are in place, the system must be connected and checked before it can produce usable power. A qualified installer connects the equipment, verifies grounding, and checks that wiring matches the approved design. They may measure voltage and inspect connections for loose fittings or damage. Small readings matter. A cable that looks secure can still need attention.
Testing also confirms that the inverter starts correctly and communicates with the monitoring system. The installer may compare its readings with expected output, though sunlight and temperature affect production. Required inspections and utility approval vary by location. Where applicable, the system is activated only after those steps are complete. It is easy to focus on the panels and overlook the handover; honestly, that is where questions can be missed.
Tips: Ask the installer to show you the shutoff switch and explain the monitoring display. Keep the inspection records and note the system’s normal status lights. If an alert appears or output changes sharply, contact a qualified professional rather than opening electrical equipment yourself.